

Saw parameter to set saw operaiton
This parameter applies only to systems with more than one program fence (split pusher). Enter the width of each pusher.
To ignore split pushers set a pusher width of 0 for the first pusher width parameter. Set a pusher width of 0 if the pusher is not used, for example, set the pusher width of the last pusher width parameter to 0 if you have only 2 split pushers.
Enter values of zero if your system has a single program fence.
If you are using split pushers take care that you set the clamp positions correctly (saw parameters) as these settings can have a big effect on which pushers are used.
Split pushers - cutting times - Split pushers allow the crosscutting of sets of staggered strips that would otherwise have to be cut separately. This can significantly reduce cutting times and the effect of the pushers is shown in the reported cutting times.
Split pusher rules - The following technical information is for reference only and you do not need it for everyday use of split pushers.
Different rules apply for saw types 11 and 12 which use the dividing line rather than clamp positions to load the pushers.
Pushers are allocated in the order 1,2,3, until a set of strips cannot be placed on a pusher. The allocation then starts again at pusher 1.
All strips on one pusher have the same crosscuts
Strips may overlap the pusher at either edge but each strip in the set must be adequately clamped on the pusher.
The clamp positions are used to determine whether a strip can be clamped on a pusher.
The sets of strips on pushers must be continuous so that there are no gaps between the pushers.
If a strip, for any reason, cannot be cut on pusher 2 or pusher 3 it is then allocated to pusher 1. All strips in a pattern can be cut.
The number of crosscuts for a set of strips cut together is taken as the number of crosscuts in the strip with the most crosscuts. This is reflected in the Number of Crosscuts figure shown on the summaries.
If no clamp positions are set then infinite clamping is assumed and the allocation of strips to pushers is determined by the pusher width.
The maximum crosscut width for each pusher is taken as the width of the pusher plus the width of the next pusher. This allows extra wide strips to overlap the pusher edge if necessary (the strips must still be clamped adequately on the pusher). Very wide strips of more than 2 pusher widths are allocated to pusher 1.
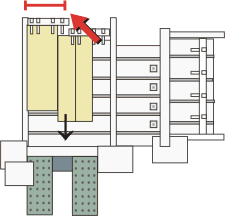
In the example above the first strip is on pusher 1, using clamps 1,2,3. The second strip does not have the same crosscuts and is placed on pusher 2. Clamp 4 (on pusher 1) remains open. The final strip is placed on pusher 3 using clamps 9,10,11. There is some overlap between the strips on pushers. There are no gaps between the strips.
If you are producing labels at the office the sequence followed for the strips on split pushers is that of the parts produced by each cut in turn. The sequence for the diagram shown above is:-
This sequence does not always match the actual cutting sequence at the saw because of the complex movement of the pushers.
For cutting dimensions for saw model 12 the saw parameter Min size of last set of strips is not needed and must be set to 0.
|
|