

Trims and saw blade thickness for each pattern in the library
The pattern properties are used to set the overall values of trims and saw blade thickness for the pattern. At the Pattern library screen:-
● Select: File - Properties
or
![]() Select the Toolbar (at the right) option
Select the Toolbar (at the right) option
- Enter the values for a pattern or template
The main choice is between a fixed pattern and a template pattern. A fixed pattern is an ordinary cutting pattern that can be used in a run. Template patterns are used a layout guides for the optimisers where the parts need to be in a fixed arrangement; grain matching is a common example.
The properties are as follows:-
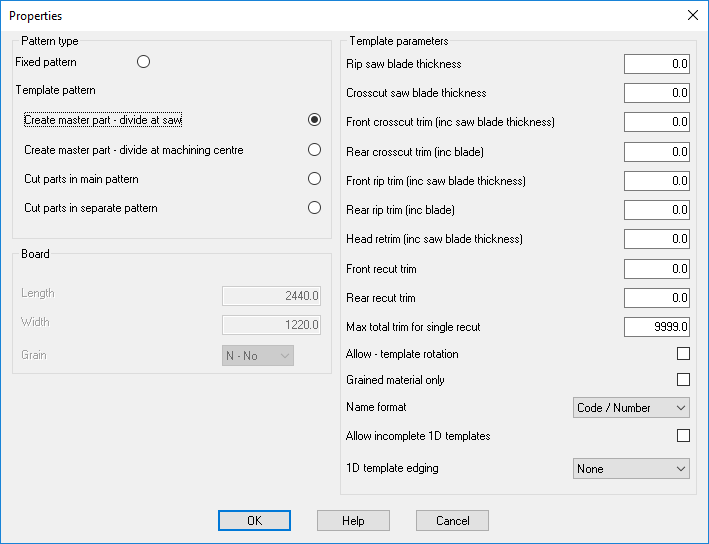
Pattern type
Set the pattern type. This is either a fixed pattern or a template pattern.
Fixed pattern - This is an ordinary cutting pattern. You usually create new patterns or save pattern from existing runs for use in later jobs. It can be useful to re-use patterns where a complex job will recur or where the pattern is specially designed for a specific production method. You can use the Manual patterns option at the Part list to use existing patterns for a job - or to use existing patterns mixed with new patterns in a job (partial optimisation).
Template pattern - A template which defines how parts are arranged which can be used for grain matching parts. There are several different types of template pattern which determine how the template is used when creating cutting patterns.
- Create master part - divide at saw - the template is cut as a master part which is later divided at the saw.
- Create master part - divide at machine centre template cut as a master part which is later divided
- Cut parts in main pattern - the template is used to place the parts in the main cutting patterns
- Cut parts in separate pattern - the template is used to place the parts in a separate cutting pattern
Access the Properties from the EDIT menu at the Pattern library or Pattern amendment screen
Board
Enter the size of the board used for the pattern.
Length
Width
Template parameters
If this is a set of values to define the basic properties of the pattern.
There are a set of values for the saw blade thickness and various trim allowances:-
Saw blade thickness
Front crosscut trim (inc. saw blade thickness)
Rear crosscut trim (inc. saw blade)
Front rip trim (inc. saw blade thickness)
Rear trim (inc. saw blade)
Head retrim (inc. saw blade thickness)
Front recut trim
Rear recut trim
Max total trim for single recut
Allow template rotation - determines whether the template can be placed on a pattern in the rotated orientation.
Grain match material only - If a pattern does not have grained material the template is not used when creating patterns. Set this parameter OFF to force the use of grain match templates for non-grained parts
Name format - this determines how the pattern template is named
There are two formats available:-
Code / Number
Run / Number
Code / number - template parts are named after the template name and a count of the number of instances of that template in the current cutting list
e.g. BASEUNIT/3
Run / number - master parts are named after the run number/name and a count of the number of master parts in the cutting list.
e.g. 00123/3
Where the grain match parts are cut within the main pattern the choice of name format is optional. However where the grain match parts are cut as a separate board it is best to use the Run / Number method so that each of the separate boards has a unique name and is easily identified at the saw.
Allow incomplete 1D templates
Templates for grain matching are set in the Pattern Library. Where the pattern is '1 x n' or an 'n x 1' layout the template does not have to be fully filled with parts. For example the template can be set up as 1 x 4 to as a template for drawer fronts - but only the first two slots are used. Set this option to allow this style of operation. See the topic: Incomplete grain match templates
1D Template edging
When an appended template is '1 x n' or an 'n x 1' layout users can configure whether this template is edged before it is divided. By default, it is assumed that the components of the template are edged after the template is divided. Set this option to 'Length edges', 'Width edges' or 'Both edges' to allow for edging to be applied before the template is divided.
Notes:
- For appended ("Create master part – divide at saw") 1D templates configured to be edged before dividing, the relevant edging information is also copied to the template part.