

Machining function - draws lines for a cutting instruction
The contour function defines the geometry of the item such as a routed shape, cut out, free format pocket etc. One or more passes define the cutting. To create a contour:-
● Select: Function - Contour
or
![]() Select
option from the Function Toolbar
Select
option from the Function Toolbar

Move the cross hair cursor to the required location
First click - Start
Move to create section
Click to end section
Left click to end
On the last line of the contour left click on the mouse at the end point; a pass is automatically created for the contour; Right click to add a further pass.
If the button shows as disabled this means that a contour element is not complete. For closed contours the 'snap to object' setting (top Toolbar) can be turned on
● Adjust the values with the Machining instructions pane at the left
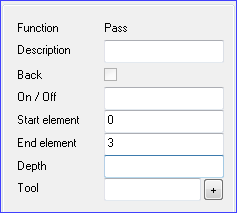
For the contour instruction the offset values affect the whole contour. The number of instructions is calculated automatically.
On/Off - whether the instruction is used or not
Back - contour is on the back of the piece Safety contours cannot be positioned on the back. 'Back' instructions are not included in tool sequencing.
The Xstart and Ystart are the starting position of the first item in the contour.
The depth is the starting depth of the contour but the depth may vary with the other items in the contour.
Angle - (enter a value in degrees) - this is used for editing nested patterns
Safety - check to create Safety borders
Pocket - check to create a Free form pocket
Free form pockets
These are pockets which have a free form shape. Make sure the 'Pocket' box is checked to define the contour as a free form pocket.
- The pocket must be closed (start point and end point are the same)
- The toolbox that appears for the pass on a free form pocket is the same as for a standard pocket but also includes a Zstart field.
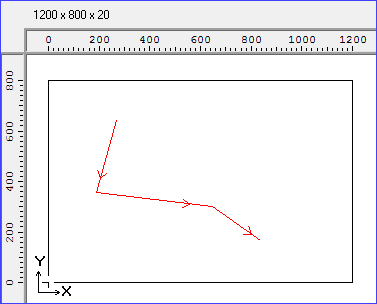
Contour instructions - Example
The instructions created for a contour typically consist of routs and one or more passes.
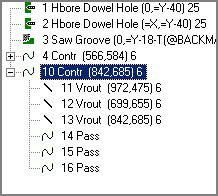
- For details on how to move through and view instructions and for inserting instructions into contours or borders see the topic: Machining instructions dialog
Transfer to machining
'Free form pockets' can only be transferred to type: 8 - Homag WoodWop V4 > V9 (MPR/X). For any other machining type free form pockets are not transferred.
Type of rout
For borders/contours there are three types of rout.
Groove router
Arc router
End
When adding a border/contour the type of rout (groove or arc) is shown on the toolbar (the button is displayed pressed).
The type of rout is also checked on the Function menu.
To change the type of rout use the Toolbar buttons or Right click for a pop-up menu.
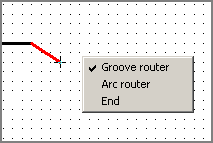
For 'End' the border is closed or a contour is finished at the last rout.
Fillet and Chamfer edit options
These options are available (Edit menu) for editing the join between two groove routs on a border or contour.
Change direction
The direction of a border can be changed via the 'change direction' option.
- Select rout on a border
- Select: Edit - Change direction (or Right click on the drawing to pop up a menu)
Notes
- 'Repeat' and 'Offset' fields are not available for instructions within a contour or a border
- When editing a border / contour point, the two routs that are connected to the point in question are redrawn as the mouse moves
- When transferring to machining centres free form pockets placed in MPR(X) files may not have the contour depth set. In this case the pass depth is used for the depth of the free form pocket.
Contours - Insert