

Machining function - A set of lines and arcs that specify the outline of a part
● Select: Function - Border
or
![]() Select the Toolbar option
Select the Toolbar option
A border is useful for non-rectangular parts such as parts with a cut-out or shaped parts.

Each part of the border can have an edging code associated with it. This is useful for edging, especially where the edging may be different for each part of the shape.
Create border (Machining library only)
- Select a machining drawing
- Select Function - Border
- Enter the border start point and description
- Enter a set of lines and arcs to define the border
- Right click of click on Border button again to finish
On finishing the border is completed by linking to the start of the border. Each set of border instructions ends with the Pass instruction.
Each section (line or arc) of the border can have an associated edging code. Use the Edging box to enter the code. Click on the list box for a list of edging codes.
Create border automatically - double click on the on the Border button
The properties of the Border function are:-
Function
Description
Back
On/Off
Xstart
Ystart
The following items such as lines or arcs are items of the border.
The Repeat and Offset fields are not available for instructions within a contour or a border.
Export border - If a drawing is exported to an MPR(X) file the instructions are the same as for a contour with a single pass and a phantom tool number. The phantom tool number is a 3 digit number. If 0 is used or the tool number is blank then no borders are exported. The depth of any border contours are the part depth.
Type of rout
For borders/contours there are three types of rout.
Groove router
Arc router
End
When adding a border/contour the type of rout (groove or arc) is shown on the toolbar (the button is displayed pressed). The type of rout is also checked on the Function menu.
To change the type of rout use the Toolbar buttons or Right click for a pop-up menu.
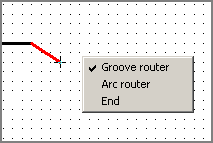
For 'End' the border is closed or a contour is finished at the last rout.
Fillet and Chamfer edit options
These options are available (Edit menu) for editing the join between two groove routs on a border or contour.
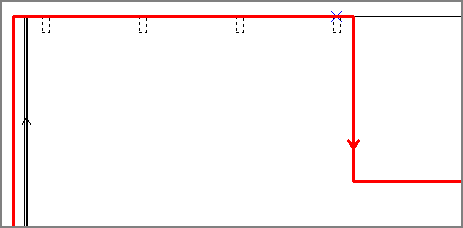
Change direction
The direction of a border can be changed via the 'change direction' option.
- Select rout on a border
- Select: Edit - Change direction (or Right click on the drawing to pop up a menu)
Notes
- Cutting list sizes - if a border contains an arc this is taken into account when calculating the cutting list size.
- When a border contains edging, the edging can only be applied to groove routs. Edging cannot be applied to arc routs on a border.
- When editing a border / contour point, the two routs that are connected to the point in question are redrawn as the mouse moves.