

How to use the Online label PC transfer with Nesting
Nested patterns can be transferred to an Online label PC system. This is typically used so that part labels can be printed at the saw. This if for cases where the Saw controller is not used for labels.
The operation of the program and the Online label PC system is generally the same as for Non-nesting patterns but there are a few changes and items to set up.

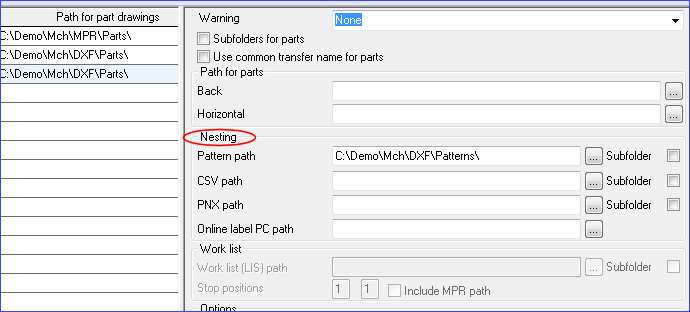
Machining centre transfer parameters
- Set the machining centre transfer parameter: 'Online label PC path'.
If this path (and the pattern path) are specified the program sends data files to the Online label PC path (as well as other transfer paths).
(This parameter is only available if the transfer type is either 8 - Homag WoodWop V4 > V9 (MPR/X) or 9 - 2D DXF nested layered.)
Label designer
Creation of label designs for the Online label PC is via the main menu option
Tools - Label Design - Online label PC
When a design has been created it can be exported to the Online label PC via the export menu option (at the label design screen). The sub menu shows the transfer modes that are set for Online label PC transfer. The label file is sent to the Online label PC path specified for that transfer mode.
Main menu
When an Online label PC path is specified in the machining centre transfer parameter a menu item for the transfer and for access to Online label PC appears on the machine interface menu.
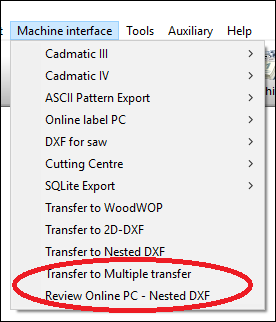
The first item is for transfer and the second item is to access the Online label PC.
Changes in Operation
- In the pattern summary - the saw reference grid column is not shown for nested runs.
- The Saw loading summary tab is named the Machine loading summary
- For nested runs - pattern drawings are shown in the machining library nested pattern view (even if the patterns contains 1 or more MPR(X) parts)
- The left and right toolbar buttons are disabled when showing a nested pattern drawing. The up and down toolbar buttons move through the parts on the pattern (in the order they will be machined).
- Transfer to saw toolbar button is disabled for nested runs.
- The properties dialog has been re-arranged so that saw specific parameters are at the bottom of the dialog and general parameters are at the top.
- A part is selected by clicking somewhere within the part area. The border of the part is then drawn black to indicate a selected part. The pattern toolbar button can be used to selected / deselect all the parts on a pattern. If the parameter 'label offcuts' has been set then any offcuts will also be selected / deselected.
- When a part has been printed it is shown with red hatching.
Shading of printed nested parts / offcuts
When a part / offcut is printed in Online label PC it is displayed with hatching where the hatching is either a lighter / darker version of the item colour.
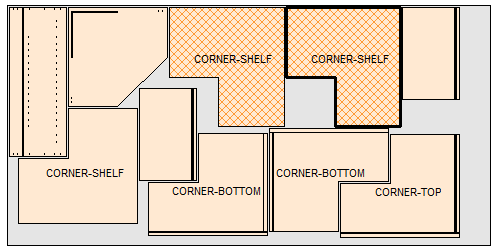
- For Mono / Flat picture / Enhanced pictures printed parts/offcuts are hatched in grey with a white background.
Main menu items
When an Online label PC security key is used the 'Review Online PC' and 'Machining centre transfer parameters' are accessible from the main menu. The transfer parameters are required to specify the Online label PC path.
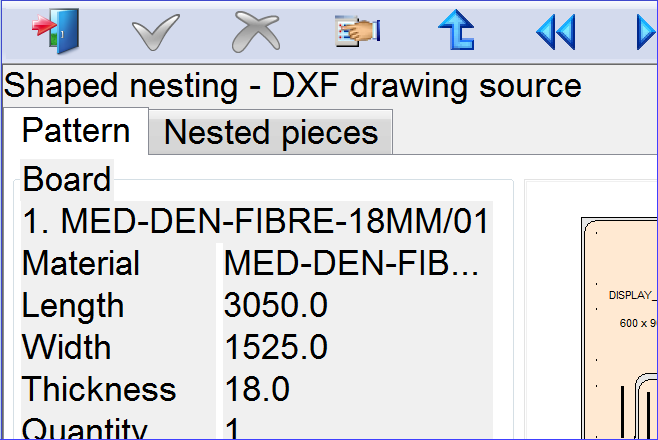
Nested pieces summary
When Online label PC is used for nested patterns the part sizes tab is replaced with the Nested pieces tab.
Labelling sequence
Offcut labels are included in the labelling sequence process.
The labelling sequences is set via the machining centre transfer parameters (Online label PC part sequence - Pattern origin and part origin)
- If Part origin is set to 'MPR(X) variable point' the centre point is used for any offcuts.
Piece numbers
Piece numbers can be shown on the part / offcut labels. The piece number is setup in the Online label PC label designer.
- Offcut pieces are numbered sequentially after the part numbers.
e.g. A Pattern with 6 parts and 2 offcuts will have piece numbers of 1 to 6 for the parts and 7 - 8 for the offcuts.
- The Piece number is only for nested patterns.
Nested patterns - part with multiple borders
In some cases a nested pattern that contains a part with multiple borders did not show the outside border correctly – this is fixed.
Stand alone options
The Online Label PC option includes a set of ‘Stand alone’ options which allow the program to be run from an external program or from a Windows batch file.
This can be useful for accessing a specific run and pattern from an external program or, for example, for printing labels in a batch or printing via an external program.
Stand alone options - specifying a run / pattern
The Online label PC program (Enquire.exe) can be started so that is shows a specific pattern from a specific run. The format is:-
Enquire.exe /MCH:<machining transfer> <run name><4 digit pattern number>
c:\v12\enquire.exe /MCH:3 "nesting - dxf0002"
Use the 3rd machining transfer parameters and opens the 2nd pattern of run 'Nesting - DXF'.
- If the run does not exist or the pattern number does not exist the Online label PC program displays the run grid or the pattern grid.
- If the Online label PC software is already running and the enquire.exe program is called again the current pattern is updated on screen. Any subsequent enquire.exe calls must point to the same saw / nesting machine as the first one.
Stand alone options - printing patterns on a run
If the argument /PRINTLABELS is used the labels for the pattern are printed.
e.g. c:\v12\enquire.exe NESTJOB0005 /MCH:1 /PRINTLABELS
This displays pattern 5 of the run NESTJOB and prints the labels for this pattern.
- If either the <run name><pattern number> or /PRINTLABELS arguments are used without also including the /MCH:xx argument an enquire.err file is created with an error message and enquire.exe does not continue.
Stand alone options - External Printing
Printing can either be done as a part of the Online Label PC program or via an external printing system.
If an externalprint.ini file is created (in the same location as the enquire.exe program) the external printing method is used.
The first line of the ‘externalprint.ini’ needs to contain a path/filename of the external printing program.
e.g. c:\machine1\printalabel.bat
For every label printed the specified program is called with 3 arguments (run/pattern number, part number, piece number)
e.g. For the 3rd pattern 3 of run NESTJOB which contains 5 pieces (based on 2 different parts - 1,2) the following calls would be made:
c:\machine1\printalabel.bat "NESTJOB0003" 1 1
c:\machine1\printalabel.bat "NESTJOB0003" 1 2
c:\machine1\printalabel.bat "NESTJOB0003" 1 3
c:\machine1\printalabel.bat "NESTJOB0003" 2 4
c:\machine1\printalabel.bat "NESTJOB0003" 2 5
Here is the contents of an example printalabel.bat file:
@echo print label here runpattern: [%1] part [%2] piece [%3] >> c:\output\printalabel.txt
In the example above the file printalabel.txt would have the following text:
print label here runpattern: ["NESTJOB0003"] part [1] piece] [1]
print label here runpattern: ["NESTJOB0003"] part [1] piece] [2]
print label here runpattern: ["NESTJOB0003"] part [1] piece] [3]
print label here runpattern: ["NESTJOB0003"] part [2] piece] [4]
print label here runpattern: ["NESTJOB0003"] part [2] piece] [5]
- For offcuts the offcut name is output for the 2nd value.
print label here runpattern: ["NESTJOB0003"] part [2] piece] [4]
print label here runpattern: ["NESTJOB0003"] part ["XMED-DEN-FIBRE-18MM/00001910"] piece] [8]
Note - If the part ID information box is defined the part number is a 4 digit number instead e.g. 0001 or 0002
Notes
- If the run is non-nested no data is transferred to the online label PC path.
![]()