

How to set up a product definition (or other item) in the Product library
A product definition can be quite complex so it is best to experiment with the part library and product library and become familiar with how products are defined before entering a large amount of data
● Move to the Product library screen to enter a new product definition (select NEW if necessary).
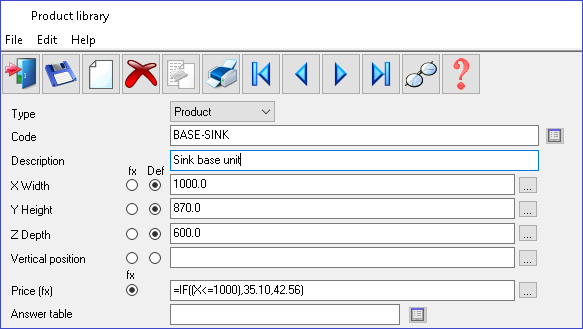
● In the top section enter the overall product description, width, depth, height ...
The product width, height and depth can be fixed size or defined by formula (fx).
The Memo fields are for additional information about the product and also have special uses for pricing and custom products (pricing information may be needed when using Quotes / Orders).
In the lower part of the screen enter the parts and fittings in the Product.
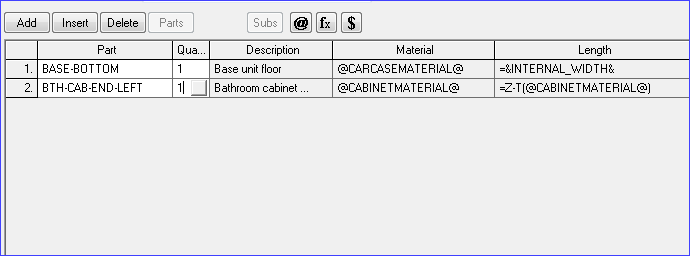
● Select the 'Add' button to create a new line
● Enter the part details
or
![]() Select a part from the part library
Select a part from the part library
(Typically parts for use in products are already set up in the Part library)
Add - enter a new line
Insert - place new line between existing
Delete - remove line
For fixed size parts the Description, Material, Length and Width are loaded from the Part library and cannot be changed at this screen. For custom parts these items may be defined by variables, for example, @CARCASEMATERIAL@.
Parts - moves to the 'Part library' to enter a part
Subs - enter a sub assembly
 Use these options to enter or select a variable,
formula or lookup
Use these options to enter or select a variable,
formula or lookup
These items are setup and defined in the Variables, Formula and Lookup tables (libraries).
Formula dialog
For fields like Width, Height, Depth click on the button at the right to pop-up the formula dialog to help with building formula.
Notes
- The library is sorted in alphabetical order of product code.