

Add or delete items in the Product
In the lower part of the Product library screen enter the parts and fittings in the Product.
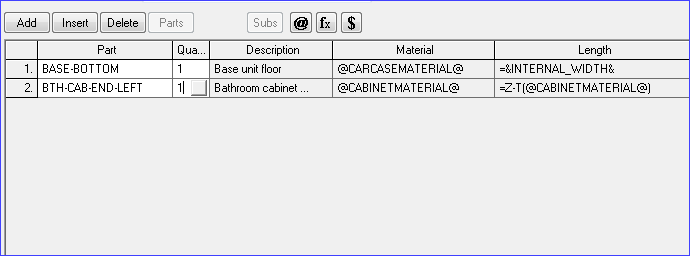
● Select the 'Add' button to create a new line
● Enter the part details
or
![]() Select a part from the part library
Select a part from the part library
(Typically parts for use in products are already set up in the Part library)
Add - enter a new line
Insert - place new line between existing
Delete - remove line
For fixed size parts the Description, Material, Length and Width are loaded from the Part library and cannot be changed at this screen. For custom parts these items may be defined by variables, for example, @CARCASEMATERIAL@.
Parts - moves to the 'Part library' to enter a part
Subs - enter a sub assembly
 Use these options to enter or select a variable,
formula or lookup
Use these options to enter or select a variable,
formula or lookup
These items are setup and defined in the Variables, Formula and Lookup tables (libraries).
Sub assembly
A sub-assembly is a group of parts which are assembled to make a sub-set of a larger product, for example, a pedestal for a desk or a drawer assembly. The sub-assembly must already exist as an entry in the product library. Move to a blank line and select the sub assembly button for a list of sub-assemblies and click on a sub assembly to add it to the part details.
Parts - open the Part library. Use this to check part details before the part is included in the product and to create new part library entries if necessary.
Set up Operations for products
Add each operation to the Part library - use a minus symbol as the first character of the 'Material' code to indicate an operation., for example, -OP
Enter the cost per hour in the box marked COST in the Part library. For each product that needs this operation enter the operation as an item in the product details screen for that product in the product library. Use the Qty column at the Product details screen to indicate a time in seconds for the operation