

Settings to describe an import file containing product information
These values are used to describe the format of external files for import a list of product requirements. At the main screen:-
● Select: Parameters - Requirements import parameters
The Requirements import parameters dialog is displayed.
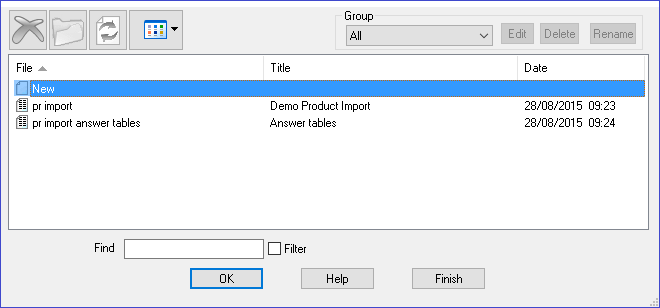
Select the Requirements you wish to import or create a new one.
A parameter dialog is displayed.
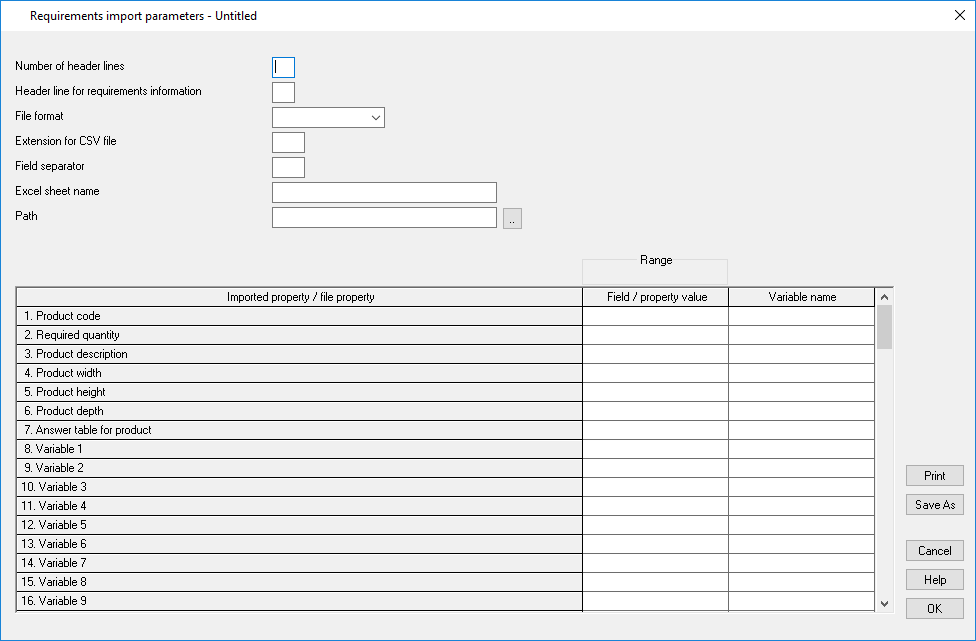
- Review or enter new details for the file you wish to import:
Number of header lines - This is used to specify how many lines to skip before the actual data is found in the import file.
Header line for requirements information - This is to nominate which line in the import file is used for the header information (e.g. optimising parameters, saw parameters etc...)
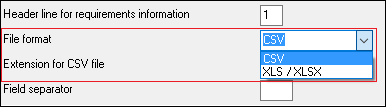
File format - This is a combo which is used to select either CSV files or XLS based files.
Extension for CSV file - This is used to specify the file extension for the import files. This is not required for XLS based files.
Field separator - This is used to specify what character is used between each field in a file. This is not required for XLS based files.
Excel sheet name - This is used to enter a specific sheet name to use during the import process. If this is left blank then the first sheet in an Excel file will be used, if the Sheet name does not exist in the XLS file then the first sheet will be used.
Path - This is used to specify the location of the import files.
Use the cursor keys or 'Enter' key or mouse to move between parameters. Overwrite the existing values to make a change. The field positions can be specified as either numbers (0 to 999) or in the Excel column style (A,B .. Z, AA, AB etc....)
The parameters are used to describe the layout of the fields in the import file - which field is the product code, which field is the product description etc.
Basic product information
The first few parameters are for the basic product information and correspond to the grid on the Product requirements screen; product code, quantity, description, width, depth, height. Enter the position of the item in the import lines. For example:-
1. Code ----------------------------
2. Quantity ------------------------
3. Description ---------------------
4. Width ---------------------------
5. Depth ---------------------------
6. Height --------------------------
Fields at the product requirements screen:-

The above data is imported from the following file:-
Import file
DRESSER,2,Dressing table,Urgent,Line AS,1000.0,1100.0,600
WARDROBE,7,Wardrobe - drawer & door,Urgent, Line AP,1000.0,1800.0,600.0
BATHROOM-CABINET,4,Bathroom cabinet,Priority,Line AS,700.0,600.0,180.0
WARDROBE,4,Wardrobe - drawer & door,Standard,Line AP,1000.0,1800.0,600.0
The layout of this file is:-
1 2 3 4 5 6 7 8
DRESSER 2, Dressing table Urgent Line AS 1000.0 1100.0 600.0
WARDROBE 7, Wardrobe - drawer & door Urgent Line AP 1000.0 1800.0 600.0
BATHROOM-CABINET 4, Bathroom cabinet Priority Line AS 700.0 600.0 180.0
WARDROBE 4, Wardrobe - drawer & door Standard Line AP 1000.0 1800.0 600.0
The import parameter values are:-
1. Code ---------------------------- 1
2. Quantity ------------------------ 2
3. Description --------------------- 3
4. Width --------------------------- 6
5. Depth --------------------------- 8
6. Height -------------------------- 7
Fields 4 and 5 are ignored as they are not used in product requirements.
The header line which is imported should contain the following information in the fixed order shown below:-
File name
Order description
Optimising parameter list
Saw parameter list
Overs percentage
The two products use the answer tables OAKANS and TEAKANS this is specified in field 5 in this example.
Data for variables
More complex products may contain variable data. Variable data is information that changes for each item or customer e.g. the delivery date or type of door handle.
If the external file already contains the answers for this variable data this can be specified in remaining variable lines.
7. Header lines -------------------- 1
8. Import - header line ------------ 1
9. Extension for import file ------- TXT
10. Answer table --------------------
11. Variable 1 ---------------------- #6,DELIVERY
12. Variable 2 ---------------------- 9,DOORMATERIAL
13. Variable 3 ---------------------- 10,CARCASEMATERIAL
The # symbol is used to indicate the item is in the imported header line and the number indicates the position in the header line.
The other items are the fields where the variable answer for each item is located e.g, DOORMATERIAL may be TEAK for one product and OAK for another.
The above values can be used to import the following file:-
Import file (complex.txt)
Example1,Week 32/A,standard,single,0,20/12/2015
DRESSER,2,Dressing table,Urgent,Line AS,1000.0,1100.0,600,OAK-18,OAK-15
WARDROBE,7,Wardrobe - drawer & door,Urgent, Line AP,1000.0,1800.0,600.0,OAK-18,OAK-15
BATHROOM-CABINET,4,Bathroom cabinet,Priority,Line AS,700.0,600.0,180.0,MARBLE-15,MEL-15
WARDROBE,4,Wardrobe - drawer & door,Standard,Line AP,1000.0,1800.0,600.0,TEAK-18,TEAK-15
For the import to be correct the relevant products and variables must already be set up in the product library and variables table.
The following example shows the import of a global variable:-
Import file (requirements.rqx)
Products RQX import,Products import,20/12/15
base-corner,500,750,300,40
The imported header is line 1, and only the first two items of fixed information are present, and the first global variable data is at field 3 (this is the delivery date).
The parameter set up is as follows:-
7. Header lines -------------------- 1
8. Import - header line ------------ 1
9. Extension for import file ------- RQX
10. Answer table --------------------
11. Variable ------------------------ #3,DELIVERY
The data in field 3 is imported into the global variable 'Delivery'
Import from Excel files
Set the extension for CSV file to XLS / XLSX from the drop down list.
If there are two files with the same name (e.g. IMPORT.XLS and IMPORT.XLSX) the XLSX file is imported.
Field separator - enter an ASCII value for character defining each field e.g. '44' = comma
Other options
Merge - copy the contents of an existing list to the current list (not available until the cursor is on the Description box or a value column). Warning - this overwrites any existing values.
The main use of this option is to take a copy of an existing list as there is no 'Save As' option for this dialog.
Print - print list of parameters. Program prompts with the standard Windows print dialog so that print settings can be checked before printing begins.
Notes
- A product variable can be specifically left blank by selecting a field in the import file for the variable and leaving it blank
- If the position for the global variable is set between 1 and 5 then the items from that point are interpreted as global variables and not fixed items (see example above).
- Global variables do not have to be in the header line they can also be answered on a line by line basis in the product lines.
- The import format can be quite straightforward, for example, just the product code and quantity required. See the help topic: Import format for product requirements
Import variables not set by import parameters
It is also possible to import variables and answers from the import file without setting a position via the parameters - this can be useful for less frequently used variables. See the help topic: Import variables not set by import parameters