

Each object on the template has a set of properties to specify its features, such as - the type of data or text, the position on the template, font size, leading text, trailing text and so on. To view properties:-
● Select object
● Select: Edit - Properties
or
![]() Select Properties button
Select Properties button
The properties for each object vary with the type of template (e.g. form or label) and the type of Object (data, picture ...) For example:-
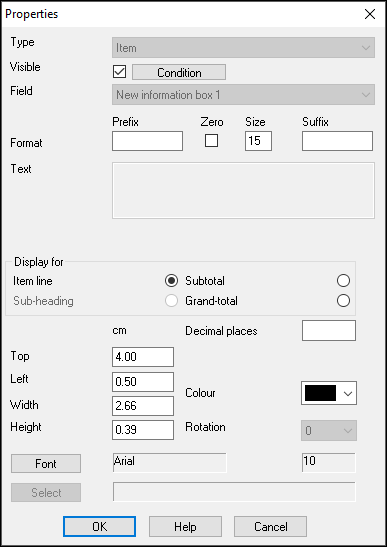
Options that are not relevant to the object are greyed out. Most objects can be positioned exactly via the Top, Left, Width, Height settings and the Font and colour can be adjusted
FORMAT - this allows for text before and after the item and to specify the maximum size (in characters) of the data shown. For example, if the item is a part length of 1045.4 use the format to show the length as: Ln: 1040.5 mm
Prefix: Ln:
Zero - not checked
Size: 6
Suffix: mm
ZERO - Use the ZERO box to say whether the data is filled with leading zeros or not. For example, '3622' is filled to '00003622'. This can be useful for representing order numbers and file names clearly.
Any leading spaces are removed before the zero fill is processed.
TEXT - if the TYPE is set to TEXT you use this box to enter the fixed text to display.
if the TYPE is set to PICTURE and FIELD is set to Per item from information box - Value, use this box with string formula to build a full image path.
COLOUR - allows you to select the foreground colour of the text with a colour dialogue. Note that to see colours in a print preview you must set the printer to a colour printer.
ROTATION - allows you to rotate the item through 90, 180, and 270 degrees. This is especially useful for rotated text on a form or label.
CHOOSE FONT - use this to choose the font of the object - this is not available for some objects.
SELECT FILE - the location for the picture file for the item. If the object is a picture object you can use this option to select the bitmap (bmp) or windows metafile (wmf) to display.
DISPLAY FOR - For items that can be totalled or used for a sub-heading this option allows you to specify whether the item acts as an Item line, sub-heading, subtotal, or 'Grand total'. Use this with the 'Sort category' for creating sorted and subtotalled lists.
Item line - appears once for every line of data
Sub heading - appears once at the start of each category change
Subtotal - appears once after each category change
Grand total - appears once at the end of each report
For most items only the normal 'Item line' option is available. For items that can be totalled the 'subtotal' and 'Grand total' options are also available. Only the 'Sort category' item can be set to 'Sub-heading'. If an item appears both as an item line and as a subtotal enter the item twice on the form and select the 'Display for' category as 'Line item' for one and 'Subtotal' for the other.
With these facilities you can, for example, create a report to print a sorted and totalled part list.
Item Size Qty
Material: MDF15
PRT/21 670.0 x 345.0 2
PRT/14 1200.0 x 780.0 15
---
17
Material: MDF18
PRT/11 920.0 x 345.0 50
PRT/31 679.5 x 450.0 20
---
70
Material: PB15
PRT/X2 1300.0 x 478.0 14
---
14
Total pieces: JOB/PARTS02 101
Header fields - These are fields that appear once per report, like Reference or part list title. In this case the 'Display for' option offers and option to print the header only on the last page (this is useful for information that you want to place on the same page as the Grand totals). e.g. 'Total pieces for Job: CUSTOMER-ABC is 247'. Grand total fields have the display for setting locked to the last page as these are values that can only be calculated at the end of a file.
Decimal Places - Manually specify the decimal placing for an information box. If an information box is type "numeric (total)", type in the number of decimal places to be displayed. This amount entered here will use part of the value entered in the size field. This value is NOT in addition to the size field.
Alignment of fields - Numeric fields are normally right aligned unless there is a prefix in which case it is left justified. A subtotal or grand-total item with a prefix (but no suffix) - left justified prefix and right justify value. Any other use of prefix or suffix - left justified.
Manual Subtotals - this is a setting on the Form parameters tab. Select this if the subtotal lines have been selected at the Quote/Orders screen with the 'line type' option.
Using Forms with manual subtotals from previous versions - If you use a form design created with a previous version of the software the Form parameter is set for manual subtotals.
To use the new method with the old form design - turn off the Manual subtotals setting and change the form design to work with the new method (as described above).
When the form parameter for manual subtotals is not set (ticked) any sub total lines set in the Quote / Orders form are ignored.
Format - A single line is automatically printed above subtotals and two lines (one above and one below) are used to highlight a grand total.
Overflow - If the value of the subtotal or grand total is not valid the total is replaced by '******'. For example if there was a non-numeric value in one of the total fields or the box length is not big enough to show the whole value or the total goes past the maximum value allowed
Groups with subtotals are not split over more than one page unless necessary.
Note - 'Sort category' field can be set as a subtotal line.
Note - options in the box are slightly different for CADmatic 1/2 labels and there are other restrictions - see topics below for details.